


Clicks ad up over time, and with this Pro Tip, The Stem promises to give you at LEAST 2 minutes of your life back!

…think of it like Princess Bride Life Sucking machine, just in reverse… and a lot slower as I found out…
Pro Tip Saving You Time
Think what you could do with that time! You could listen to Elvis Presley, “All Shook Up” once more, you could soft boil an egg, I”M GIVING YOU BACK THAT TIME!
By default, the Finder is rigged to show easy access to Airdrop and iCloud Drive on the left-hand menu in all open Finder windows. This is well and good, except for the fact you probably have to click on the Finder icon to bring them up. That click adds up over time… what if we could do without the click? I’m going to show you a way to place those function directly onto your Dock, a mere SINGLE click away!
Just a refresher for those that may not be aware; Airdrop is a file transfer protocol. It allows easy transfer of files between all your Apple devices. You can grab a document or photo and easily send it to your iPhone or iPad. iCloud Drive is, of course, your storage space available through Apples iCloud service associated with your Apple ID, which is 5GB by default.. but you can expand that to 2TB for next to nothing per month!
Ok, down to brass tacks here, let’s locate the actual Finder App itself, you can do that by simply opening a Finder window and searching for it. Look to the upper right side of any Finder window to find the search bar, type in “Finder”, make sure to select “On This Mac” in the left-hand area. From there, RIGHT-CLICK on the Finder icon and select “Show Package Contents”.
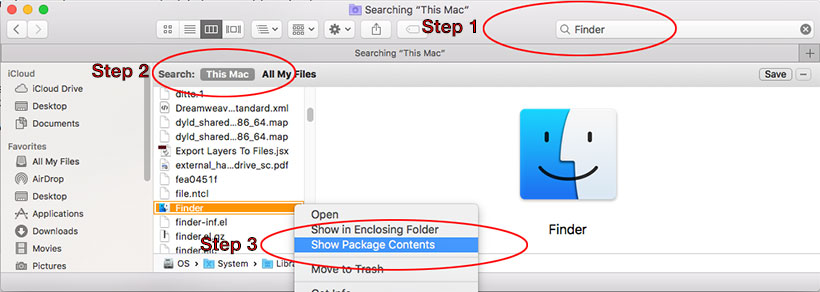
Now, depending on your current Finder view, you may be shown one of two things… another Icon of just the Finder, or a folder called “content”. If you do see the Finder icon on its own, just right-click again and choose the same “Show Package Contents”.
Now that you see the “contents” folder, open it up and look for a folder called “Applications”, open it.
Voila!
You should see a few of the core applications to your computer!
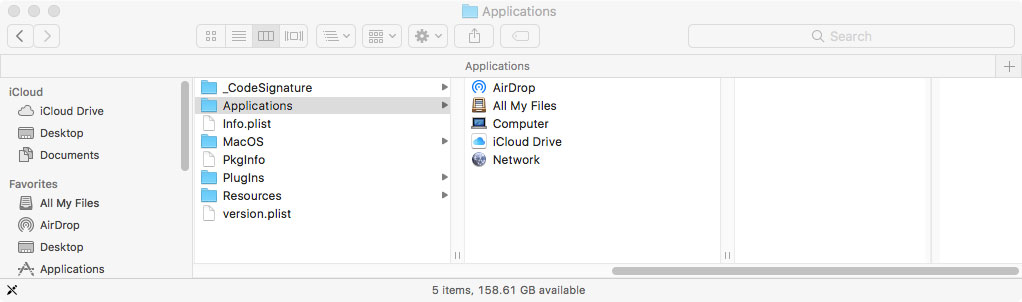
Now, all you need to do is grab any of those icons, drag them down to your dock, wait for the existing icons to spread apart, release, and BOOM, 1 click access to those functions!
We sincerely hope you enjoy those two minutes we’ve handed to you, gift wrapped and free of charge!

- Western Digital My Book Live Hack – KEEP IT DUMB & LOCAL! - August 24, 2021
- WWDC 2021 – macOS Monterey Gets Forked - June 21, 2021
- TELUS Health Companion – BYO Apple Watch - May 27, 2021
Facebook Comments